How to Open the Settings App on Your Chromebook
Let us begin this guide by explaining how to get to the Settings app in Chrome OS. There are three ways to access Chromebook settings. It is available as an app in the Chrome OS launcher. Search for “settings”

You can pin the Settings app to the launcher for quick access.
The second method is to type in chrome://settings into the address bar of the Chrome browser. The UI looks and works the same way regardless of how you open it.
The third method is to open the Chrome browser settings (ALT+ E) and then choose Settings from the list.
Let me first show you what the Chrome OS settings page/app looks like:

Chrome OS settings are grouped into the following categories. To view this menu, click the hamburger menu on the top-left corner of the Settings app.

- Network
- Bluetooth
- Connected devices
- Accounts
- Appearance
- Device
- Wallpaper and style
- Privacy and security
- Apps
- Accessibility
- System Preference
- About ChromeOS
Now, let us review each of these sections in detail.
Network
The Network section of the Settings app has the following options:
WiFi
If you are already connected to a WiFi network, you will see the network name here. Right next to it, there is a slider to turn WiFi on or off.

Click on anywhere on this row to see all the other available WiFi networks. Click on any other WiFi network name to connect to that network.
You can also click on the current WiFi network that you are connected to, for additional options like:
- Forget or disconnect from the network
- Slider to “prefer this network” over other networks
- Automatically connect to this network (you might want to disable this for public WiFi networks
- The IP address of your device, provided by your router
- An advanced field that you can expand to reveal additional details about the network like signal strength, security, frequency, etc.
- You also have a “network” expandable menu to either assign IP automatically or do that manually. You will also see an option to change nameservers here. If you want to use Google DNS servers, you can do that from here.
- The “Proxy” expandable menu gives you options to configure proxy networks.
Mobile Data
Mobile Data is the second item under the Network menu. There are two main ways to use mobile data on Chrome OS.
If you have a Chromebook with a SIM card slot, you will see the connection details here.
The majority of us however will use is Instant Tethering. You can use this feature if you have a supported mobile phone and Chromebook.
Below the Mobile Data section you will see the following two options:
- Add WiFi: This lets you connect to a hidden network by entering WiFi network details like SSID and password manually.
- Add OpenVPN / L2TP: This is where you add VPN networks if you use any. I wouldn’t go into the details of configuring VPN networks in this guide.
Bluetooth

Next up, is Bluetooth. From the home page of the Settings app, you have a slider to turn Bluetooth on or off. For additional options, click anywhere on the Bluetooth section of the Settings app.
Never pair your phone with your Chromebook via Bluetooth. You CAN NOT use this method to transfer files. Chrome OS uses Bluetooth to connect to your phone for things like Instant tethering and Smart Unlock. This is different.

From the Bluetooth settings page, you can see and manage paired devices. When you open this page your Chromebook will start searching for new Bluetooth devices within range.
Connected Devices
Connected Devices is where you see Google’s “Connected Devices”
This feature allows you to connect an Android phone to your Chromebook and use a couple of features:

- Smart Lock: This lets you unlock your Chromebook using your connected smartphone.
- Instant Tethering: This allows you to easily connect to your phone’s WiFi hotspot, a really easy one-click method.
- Messages: This lets you read and reply to your Android phone’s text messages from your Chromebook.
If you already have a device connected, you will see this listed here. Click on the name of that device for additional options.
If you already have a device connected and want to remove it, use the “Forget phone” link on this page.
People
The People section is where you manage your profile and settings, and also other users if you are the owner of the Chrome OS device.
Profile
The first option in this section is your profile icon and email address. Click this icon to change your profile picture.

The first option (camera icon) is used to take a picture using your Chrome OS device’s camera and set it as your profile picture.
The Next (folder icon) option is to select one of the pictures saved on your Chromebook and set that as your profile picture.
The third option lets you choose your Google account picture as the Chrome OS profile picture.
After these three options, you will a bunch of icons (including animated GIFs) to set as your profile picture.
Sync
Sync is where you control what you want Google to store and sync across devices. You can either choose to “Sync everything” or pick individual items to sync.
I usually sync everything, but I have also experimented with disabling sync for extensions and apps so that I can have a different set of apps on different devices.
Remember that when you restore a Chromebook after a reset, or while setting up a new Chromebook, only those items that you have enabled sync for will be restored. Everything else will be deleted and will need to be set up again.

The Sync settings page also lets you control your sync encryption options. You can either use a sync passphrase or your Google account password.
A note on syncing bookmarks: If you sync bookmarks across your devices, things should work fine. However, if you chose to disable bookmarks syncing on one device and keep it on for others, things might get a little tricky. Let’s assume that you have a Chromebook and Chrome on a PC and both have a separate set of bookmarks. Now, you Powerwash your Chromebook and set it up again. You will not get the bookmarks from your Chromebook. You never synced them to the cloud, right? You may not even get the bookmarks from your PC, because those bookmarks are not stored on the cloud, because they are not synced.
Screen lock and sign-in
Note: You will be asked to enter your login password to access this section. This is for additional security.
This section allows you to control a few security-related options. The first option is “Show lock screen when waking from sleep”. I keep this enabled on all my Chromebooks. With this enabled, your Chromebook will ask for a password if you close the lid and open it again.
Screen lock and sign-in options allow you to use a PIN to unlock your Chromebook. By default, this is set to password only.
If your Chromebook or Chrome OS tablet supports fingerprints, this is where you will add or edit fingerprints. You most likely added fingerprints while setting up the device, but if you want to add additional fingerprints, you can do it here.
Manage other people
As the title suggests, this is where you manage other users on your Chromebook, if you are the owner of the device. The owner is the first user who logs into the Chromebook during the setup.
You can enable or disable guest login from here. If enabled, an option to use the Chromebook as a guest will be displayed on the login screen.

The second option on this page is another security feature. The “Show username and photos on the sign-in screen” slider lets you show or hide user profiles on your Chromebook. When this option is enabled, you will have to enter BOTH your email address and password on the login screen to log in. It is said that the first step in hacking an account is knowing the username. Disable this for added security.
The “Restrict sign-in to the following users” slider is also another security feature. By default, the Chrome OS login screen offers an option to add new users. You can give your Chromebook to a friend or a family member and ask them to log in using their Google account, and that creates a new user profile on your Chromebook for them. This is a useful feature. However, if you want to stop others from using your Chromebook, keep this slider enabled and the only way to add a new user will be this page. An “Add person” link appears when you enable this slider.
Autofill
You might have noticed Google Chrome trying to remember all the addresses and other information that you entered into websites and trying to help automatically fill them the next time you visit the same website. All that information gets collected and is managed from the Autofill settings.
Passwords
If you use Chrome to save passwords, this is where you can:
- Enable or disable this feature using the “Offer to save passwords” slider.
- Auto Sign-in lets Chrome enter your login details to a website if you have stored them. So, instead of seeing the Facebook login page with your login ID and password filled in, Chrome will log into Facebook for you, when you open the website.
- There is a link to see all your saved passwords online. If you have encrypted your passwords using a passphrase, you won’t be able to see any passwords online.

And then, there is a long list of all the login IDs and passwords that you have saved so far.
- Click the “eye” icon to view the password.
- Click the three dots menu to remove the password from Chrome.
When Chrome fails to autofill one of the passwords that I have saved, this is where I come to see the password and manually enter it.
The most useful feature on this page? The “Search passwords” field is in the top right corner.
Payment Methods
Just like passwords, Chrome can remember your credit card details and help you enter them quickly during an online purchase.
Note that I am not advocating you use this feature here. The flexibility of easy autofill comes with the responsibility to keep your Google account safe by following Google’s and other general security guidelines.

You can enable or disable the payment methods autofill from here. If you have this feature enabled, you can view saved cards and also add new cards here. To remove or edit a card, you will be redirected to an online page.
Addresses and more
I don’t know what this “more” stands for here, but you will see your saved addresses here.
Similar to other autofill options, you can enable or disable this feature here, and also add new addresses, and edit or remove existing ones from this page.
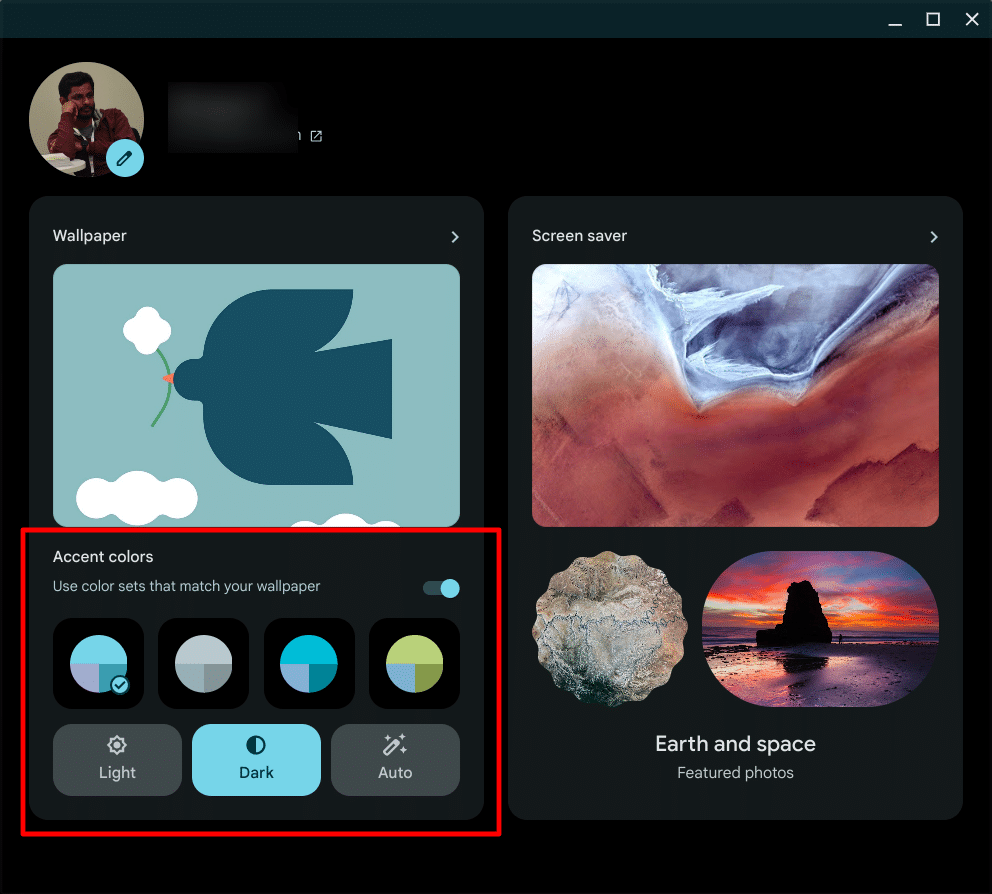
Appearance
This section, as the title suggests, lets you customize the look and feel of your Chromebook.
The first two items on this page are links. Wallpaper opens the Wallpaper app. Browser themes is a link to Chrome Web Store where you can download and install Chrome browser themes.
The showhome button is used to show or hide the home button on your Chrome address bar aka Omnibox.

The home button can be used to quickly go to the home page that you have set.
Right below this, you will also see an option to set a page as your home page. The default is “New Tab Page”. You can however enter any URL to be your home page.

The show bookmark bar is another slider that lets you show or hide the bookmarks bar. The bookmarks bar is a row of bookmarks right below your address bar.
I use the bookmarks bar VERY often. I have stored a tonne of bookmarks thereby removing their titles and keeping only the icon.
Also, you can use the keyboard shortcut CTRL + SHIFT + B to show or hide the bookmarks bar.
Font Size
By default, this is set to Medium, which is the recommended font size. You have the following options:
- Very small
- Small
- Medium
- Large
- Very large
Customize fonts
Want more control over what and how fonts are displayed? This is where you will do it.
You get a slider to control the font size and you slide it up to “Huge”. The minimum font size also can be adjusted.

You also have the option to change the default fonts. If you need even more control, there is a link to download a Chrome extension that will let you make more changes.
Page Zoom
If you want to make your web pages bigger than their default size, this is where you can set the zoom. By default, this is set to 100%. This means 100% of whatever is the page’s setting. If you change it to 120%, Chrome will show you content in 120% of what’s page’s default setting.
If you ever
Device
The device section is where you control your Chromebook’s hardware. You will find settings for your touchpad, keyboard, stylus, and display here. Let us dive in!
Touchpad

- Enable tap-to-click: With this enabled, you can tap your touchpad instead of clicking, to select something. If you don’t have this enabled, I recommend trying this out. I use it every day.
- Enable tap dragging: By default, the way to drag something around on the screen is to touch and click and hold with one finger and then drag using another. With this enabled, you can double-tap something and then start dragging. However, it is very tricky to use. So, give it a try and see if you can get it to work. (Pro tip: Do not let go after the second click.)
- Touchpad speed: Controls how fast the mouse cursor moves when you move your fingers on the touchpad. You should play with it for some time, find out what speed works for you, and then set that. Ideally, this should be one of the first things you do on any Chromebook after the initial setup.
- Scrolling: You have two options here. Traditional scrolls the page in the opposite direction as your finger. If you move two fingers up on the touchpad, the contents on your page will move down, and vice versa. If you choose Australian scrolling,
Keyboard
The first set of options on this page allows you to “remap” certain keys on your Chromebook’s keyboard.
For example, you know that Chromebooks do not have a Caps Lock key. They come with a Launcher key (formerly known as the Search key) instead. What if you want it to be the Caps Lock key? Like, you press the Launcher key and instead of opening the launcher, it turns Caps Lock on?
You can do this from the Keyboard settings. You can remap:

- Launcher
- Ctrl
- Alt
- Escape
- Backspace
- Assistant (coming soon)
To:
- Launcher
- Ctrl
- Alt
- Caps Lock
- Escape
- Backspace
- Disable
Note: Remapping the Launcher key is not recommended. This key is used in various keyboard shortcuts and those keyboard shortcuts will not work if you remap the Launcher key.
Treat top-row keys as function keys
This lets you use the top row of the Chrome OS keyboard as Function Keys (F1, F2, F3, and so on). By default, the keyboard has Chrome OS-specific keys which include reloading, brightness, volume, etc. When this option is enabled, you can hold down the Launcher key and use the top row as F1, F2, etc.
Enable auto-repeat
Auto-repeat allows you to use press and hold down a key to repeatedly type that letter. For example, press and hold down the L key, and your screen will be filled with the letter “L”.
You can control:
- Delay before repeat
- Repeat rate.
Read more about this feature here.
View keyboard shortcuts link opens the keyboard shortcut viewer.
Change language and input settings is a shortcut to the Advanced section of Settings where you can change your Chromebook’s language.
Stylus
A handful of Chromebooks and Chrome OS tablets come with a stylus. If you have one such device, this is where you can manage settings related to the stylus.
The stylus menu appears when you use a stylus with your Chromebook. Show stylus menu on the shelf is used to always display a stylus menu on the shelf.
The default note-taking app is Google Keep. If you have any other note-taking app installed, you can choose it from the Note-taking app drop-down menu to select the app of your choice.
If you don’t have any such app but want to explore a few options, click the Find more stylus apps link to open Google Play Store.
Lock screen notes let you control taking and displaying notes from the lock screen. These options might go away soon.
Displays
This is where you will control your display’s resolution and orientation etc. If you have external displays connected, you will be able to manage those from here as well.

If you don’t have any external displays connected, you will just see “Internal Display”
Displays Size is where you will control your resolution. Use the slider to pick a resolution between “Tiny” and “Huge”. Don’t worry, you will see the resolution in numbers (for example, 1905X1270) next to the slider, for reference.
The Orientation drop-down allows you to change the display orientation. For example, if you want one of your displays to be in vertical mode, this is where you do it.
The Night Light slider lets you enable or disable this feature. You can also do this from the shelf menu (bottom right corner of your screen).
If Night Light is enabled, you get two more additional options. You can control the color temperature of the screen (I wouldn’t recommend changing this unless you know a lot about displays and display temperatures)
You can also schedule night lights similar to Android. For example, you can configure Night Light to be enabled automatically at 6 Pm.
Storage Management

Here is what you get on the Storage Management page:
- A progress bar showing available and used storage on the device
- Downloads – displays how much storage is used by the Downloads folder.
- Offline files – This shows storage used by Chrome’s offline files. Click the trash icon to delete these files
- Browsing data – Displays storage used by browsing data from Chrome. Click the link for options clear these files.
- Android storage – Displays storage used by Android apps. Click to open the Android Settings app with detailed information on storage used by the Android side of things.
- Other users – If you are the owner of this Chromebook, you will see storage space used by other users here.
Power
The first item under “Power” is your current battery percentage and remaining hours/minutes.
When idle drop-down lets you choose what happens when you don’t use your Chromebook for a few minutes. You have the following options:
- Sleep
- Turn off display
- Keep display on
The default option is Sleep.
How long does it take your Chromebook to be considered “idle”? Here is a table from the Chrome OS Inactivity Delays page.
| Power source | Dim screen | Turn screen off | Suspend/sleep |
|---|---|---|---|
| Battery | 5 minutes | 5.5 minutes | 6.5 minutes |
| AC | 7 minutes | 7.5 minutes | 8.5 minutes |
Sleep when the lid is closed is enabled by default. It locks your Chromebook when you close the lid. I would recommend leaving this enabled for security and to avoid unexpected battery drain.
Search and Assistant
“Search engine used in the address bar” can be changed from here. Google, of course, is the default search engine. Select a new search engine from the drop-down menu to change.
If you don’t have the search engine that you are looking for in the drop-down menu, or you want to add a new custom search engine, click the next option, “Manage search engines“
From the Manage search engines page you can:
- Search existing search engines (every time you search inside a website, Chrome adds it as a custom search engine. So this list can be very long).
- Add new search engines. Click the “Add” button to do so.
- Click the three dots icon against each search engine for additional options.
- These additional options include “Make default” (to make that search engine the default one), Edit (to change the name or URL) and Remove from the list (delete search engine).
Google Assistant
As the name suggests, this section allows you to manage how Google Assistant works on your Chromebook.
I have a separate article explaining this in detail. Read: How to Use Google Assistant on Chromebooks. I also made a video, to help you with this:
Google Play Store
The Google Play Store section has two main options:
- Manage Android Preferences: This opens the Settings app from Android. I will write another page like this about Android on Chrome OS and link from here soon.
- Remove Google Play Store: This option allows you to remove Google Play Store and Android apps from your Chromebook.

Linux
You will see the option to enable Linux support on your Chromebook right below Google Play Store. This is a completely different and big topic that will require another page. I do not use Linux on my Chromebook, so I may not write about it soon.
On Startup
What do you want Chrome to do when you open it each time? You have three options:
- Open a New Tab Page: This is the default option. It shows the new and highly customizable New Tab Page.
- Continue where you left off: Remembers all your open tabs from the previous browsing session and lets you continue where you left off.
- Open a specific page or set of pages: As the name
suggests , it lets you open a page or a set of pages each time you open Chrome.

That brings us to the end of the first part of the Settings app Now, let us explore the “Advanced” section. Ready?
Advanced Settings in Chrome OS
The Advanced section of the Chrome OS Settings app has the following subcategories:
- Date and time
- Privacy and security
- Languages and input
- Downloads
- Printing
- Accessibility
- Reset Settings
Now, let us explore each of these options in detail.
Date and Time
The first item under Date and time is the option to choose the timezone. You can set this to be automatically set based on your IP or WiFi/Mobile network information. If not, you can choose from the list to set a timezone manually.

The next option under Date and time is the slider to enable or disable the 24-hour clock. This is disabled by default.

Privacy and security
This section has several options. Let us review them one by one.
- Use a prediction service to help complete searches and URLs typed in the address bar or the app launcher search box: Google wants to suggest websites and search keywords when you start typing into the address bar. For this to work, Google (or your default search engine) needs to know what you are typing. That means, that whatever you type will be sent to the search engine even before you hit Enter. This is enabled by default. Don’t want your search engine to know about things before you complete your search query? Disable this.
- Use a prediction service to load pages more quickly: To make things faster, Google wants to guess/predict what links you might click on a page and load them in the background. If you click one of those pages that Google pre-loaded, it will load very fast. However, when Google preloads the page in the background, those pages can access your cookies or place a cookie in your browser even before you visit them. This happens even if you don’t visit them. This is enabled by default.
- Use a web service to help resolve navigation errors: Have you noticed Chrome suggesting the correct website when you accidentally type an incorrect address? How did Google manage to do that? Chrome uses a web service to communicate what you typed. This is enabled by default.
- Safe Browsing: This is a Chrome feature that protects you against phishing, social engineering, malware, unwanted software, malicious ads, intrusive ads, and abusive websites or extensions. You can read more about it here. This is enabled by default.
- Help improve Safe Browsing: If enabled, sends some system information and page content to Google. This is disabled by default. You can enable this if you want to contribute to improving Safe Browsing.
- Automatically send diagnostic and usage data to Google: If enabled, Google will collect anonymous data to improve Chrome OS.
- Use a web service to help resolve spelling errors: To use an online version of spell check, Chrome OS will have to send everything you type to a web service. This is where you enable this feature.
- Send a “Do Not Track” request with your browsing traffic: This sends a request not to track your activity, on websites. Remember that this is only a request, and websites can still track you.
- Allow sites to check if you have payment methods saved: If you have saved payment methods in Chrome, this should be enabled to use them online. Chrome will offer to complete transactions quickly using the saved information. Read more about it here.
- Keep WiFi on during sleep: Do you want your Chromebook to stay connected to WiFi even when it is in Sleep mode? Enable this.
Enable Verified Access
Not all Chrome OS devices will have the Enable Verified Access feature. Verified Access enables your Pixelbook to certify that some cryptographic keys are protected by Chrome hardware. Read more about it here.
Manage certificates
You can view existing certificates and import new ones here. Most of us wouldn’t need to change any of these. I recommend leaving them as it is unless necessary.
Content Settings
This is where you can manage permissions related to cookies, location, a camera, etc.
There are three types of permissions. I will explain them with the example of a camera.
- Ask: If the Camera is set to “Ask”, every time a website tries to access your Chromebook’s camera, it will have to ask your permission. You can allow or deny access.
- Allow: If the Camera is set to Allow, any website can access your camera without specifically asking your permission.
- Block: If the Camera is set to Block, you won’t see the permission request even if a website wants to access your camera. Permission is denied by default.
Let us explore each of these items in detail:
- Cookies: By default, all sites are allowed to save and read cookies. This is usually required for websites to work as intended. For privacy, additional options available under Cookies are:
- Keep local data only until you quit your browser (if enabled, cookies will be removed when you close Chrome).
- Block third-party cookies: When you visit website A, another website, B, can sometimes read and store cookies on your computer, because A is designed that way. This option stops such cookies.
- The Add button below Block, Clear on exit, and Allow can be used to manually add websites under these categories.
- You can also see websites that have any of these permissions set.
- Location: Recommend and the default setting is “Ask before accessing”. Block and Allow will have sites that you allowed or blocked from accessing your location in Chrome.
- Camera: “Ask before accessing” is the default and recommended. You will see allowed and blocked sites here too.
- Microphone: “Ask before accessing” is the default and recommended. You will see allowed and blocked sites here too.
- Notifications: “Ask before accessing” is the default and recommended. You will see allowed and blocked sites here too.
- JavaScript: Allowed is the default and recommended. Most websites require JavaScript to function.
- Flash: These settings are for Chrome’s built-in Flash player. Ask first is the default and enabled.
- Images: Show all is recommended and the default. This is required for websites to load images by default.
- Pop-ups and redirects: Blocked is the default and recommended. You can allow specific websites and you will those websites under Allow list.
- Ads: This will not block all ads if enabled. Rather, this is for misleading and intrusive ads. This is a recent addition.
- Background sync: If enabled, this will allow recently closed websites to finish sending and receiving data. For example, if you close a website while it is sending a message, it will be allowed to complete that transmission even after you close the tab.
- Sound: Allow is the default and recommended.
- Automatic downloads: Ask before downloading is the default and recommended. You can set exceptions or completely block sites and you will see those sites here under Block and Allow.
- Unsandboxed plugin access: Some sites need plug-ins so they can let you do things like stream video or install the software. This requires bypassing Chrome’s plugin sandboxing. Ask is the default and recommended.
- Handlers: This is similar to the default application on your Android phone or computer. When you click an email address on Chrome, do you want Gmail to open and handle that request for you? If yes, Gmail should have the Handlers permission set to allow.
- MIDI devices: This is for MIDI (Musical Instrument Digital Interface). Ask is the default.
- Zoom levels: If you increase or decrease zoom levels on any website, you will see them here. You can click the X icon against any website listed here to remove the zoom level. When you are on a website, use the CTRL key and or Minus keys to increase or decrease the zoom level.
- USB devices: Want to allow websites to access USB devices on your Chromebook? This is where you enable or disable this access.
- PDF documents: Do you want to download PDF documents or let Chrome open them for you in a tab?
- Protected content: Some websites, like Google Play Movies, would want to verify your device before playing protected content. Allow is the default and recommended.
- Clipboard: Ask when a site wants to see text and images copied to the clipboard (ask is the recommended)
- Payment Handlers: Similar to “Handers”. This is for payment websites to register as a service that can complete purchases that you do with Chrome. Allow is the default and recommended.
Clear Browsing Data
The Clear browsing data link opens a pop-up with additional options. These options are organized into two sections:
- Basic
- Advanced
Both sections have a Time range drop-down that lets you choose the period for which you want to clear the browsing data for. This includes:
- All-time
- Last 24 hours
- Last 7 days
- Last 4 weeks
Basic
From the Basic section, you can clear the following:
- Browsing history
- Cookies and other site data
- Cached images and files
Select the items you want to clear and click Clear data.
Advanced
The Advanced section includes a few more types of browsing data that you wouldn’t usually want to clear. For example, assume that you are trying to fix an issue with gmail.com and one of the troubleshooting steps is to clear your browsing data. You wouldn’t want to clear your stored passwords, would you?
From the Advanced section you can clear the:
- Browsing history
- Download History
- Cookies and other site data
- Cached images and files
- Passwords and other sign-in data
- Autofill form data
- Site Settings
- Hosted app data
You will also see how much data you have under these items. For example, under saved passwords, you will see how many websites you have saved passwords for.
Similar to the Basic section select the items and click Clear data.
Languages and Input
This section is divided into three:
- Language
- Input method
- Spell check
Language

When you expand the Language section you will see languages that you have already selected. You will see a settings (three dots) icon against each of these languages. From this menu you can:
- Display Chrome OS in this language: If the language is supported, you change the display language of Chrome OS to this. You will need to restart your Chromebook for this to text effect. After the restart, Chrome OS will start displaying all the settings and other user interface elements in this language.
- Offer to translate pages in this language: You might have noticed that Chrome offers to translate web pages in any language other than what you have selected as your default language. You add a new language under Languages and Input > Languages because you know that language. Right? So, Chrome will stop offering to translate pages in this language. What if you want Chrome to continue to offer translations in this language too? Check this box and you will continue to see the translation prompts.
- Move up, Move down and Remove: If you have more than two languages listed, use Move up / Move down or Move to the top options to change the priority of the languages.
Below the list of current languages, you will see Add languages. This opens up a pop-up, complete with a search box, to find and add new languages.

Offer to translate pages that aren’t in the language you read
This slider enables the translation prompts that you see when you visit pages in any other language than what you have listed on the above screen. Disable this if you don’t want to see translation prompts.
Input method
This is where you manage your keyboard layout and more. The keyboard that you have enabled is displayed as the first item under the Input method.
To add a new input method, click “Manage input methods“. You will see a list of available keyboards, organized into groups based on the languages you have selected under the Languages menu.
Select a new input method by clicking the check box. Now, click the back arrow icon to get back to the Input method screen. You will see the new keyboard listed right below your current keyboard. Click the newly added keyboard to enable it.
Click the previous keyboard’s name again to go back to the previous setting.
If you use multiple keyboard options, it will be a good idea to enable the slider “Show input options on the shelf“. This will enable an icon right next to the system tray to quickly switch between your keyboards.
This icon opens a menu with your keyboards, and an option to switch to a drawing keyboard (pencil icon) or speech-to-text keyboard (microphone icon).

The emoji icon of course opens up an emoji keyboard.
You also get a gear icon as a shortcut to the Input methods section of Settings up.
Spell check
The first item under Spellcheck is the list of your languages with a slider to enable or disable spellcheck for each of them.

Custom Spelling
The Custom Spelling section is where you all the words that you have added to your dictionary. These are words that are not part of the dictionary by default. It could be a word or product name that you frequently use, and do not want to see a red line underneath it each time you type.
You will notice that my custom dictionary is full of words that I frequently type on this blog!

Click the X icon against any word to remove it from your custom dictionary.
To add a new word to the custom dictionary, enter the word in the “Add a new word” field and click “Add the word“.
Downloads
Location: This is where you change the default download folder in Chrome OS. Click Change and the Files app will be displayed. Browse and select the new location and click “Open” to change the download location.
Ask where to save each file before downloading: This slider lets you pick a folder to download files to each time you download something.
Disconnect Google Drive: Removes Google Drive integration from the Files app.
Network file shares: Let you add Server Message Block (SMB) file-sharing services. Click Network file shares and then Add File Share to add a new SMB drive.
Printing
Chrome OS lets you connect to local printers and Google Cloud Print-supported printers.
Printers
The Printers section is for traditional printers. If you already have a printer set up, you should see it when you click Printers.
If you do not have any printers, click Add Printer to get started. This lets you add a printer manually.
Refer to the official documentation here.
Google Cloud Print
If you have a Cloud-ready printer, this is where you will find it. You can add a Cloud Printer to your Google account and print from anywhere, or let your friends and family share the printer.
Find the official documentation here.
Accessibility
Accessibility requires a page dedicated to those options. For now, I will list the two main options:
- The first item under Accessibility is “Always show accessibility options in the system menu” This enables an accessibility menu in the system tray.
- Click Manage accessibility features to see additional options.
Reset Settings
There are two options under Reset Settings; Restore settings to their original defaults and Powerwash.
Restore Settings to their original defaults
This resets only the Chrome browser. Use this option if you want to restore Chrome to its original settings, or, if you think an extension or app changed your browser settings, use the option to restore peace and calm!
Here is a list of things that will be restored to their default values:
- Default search engine
- Homepage and tabs.
- The new tab page.
- Content settings.
- Cookies and site data.
- Extensions and themes.
Powerwash
Powerwash = factory reset.
Note: If your Chromebook is managed by your school or office, you won’t be able to Powerwash it. You will need to contact your IT administrator.
Powerwash deletes everything on your Chromebooks. This includes all your apps and files. This means you should back up anything you need before attempting a Powerwash.
Powerwash requires a restart to complete.
Want to know when and how to reset your Chromebook? Read Reset your Chromebook (When and How)
Leave a Reply